Interface Tour
A quick walk around the main window so you know where everything lives before you start cutting.
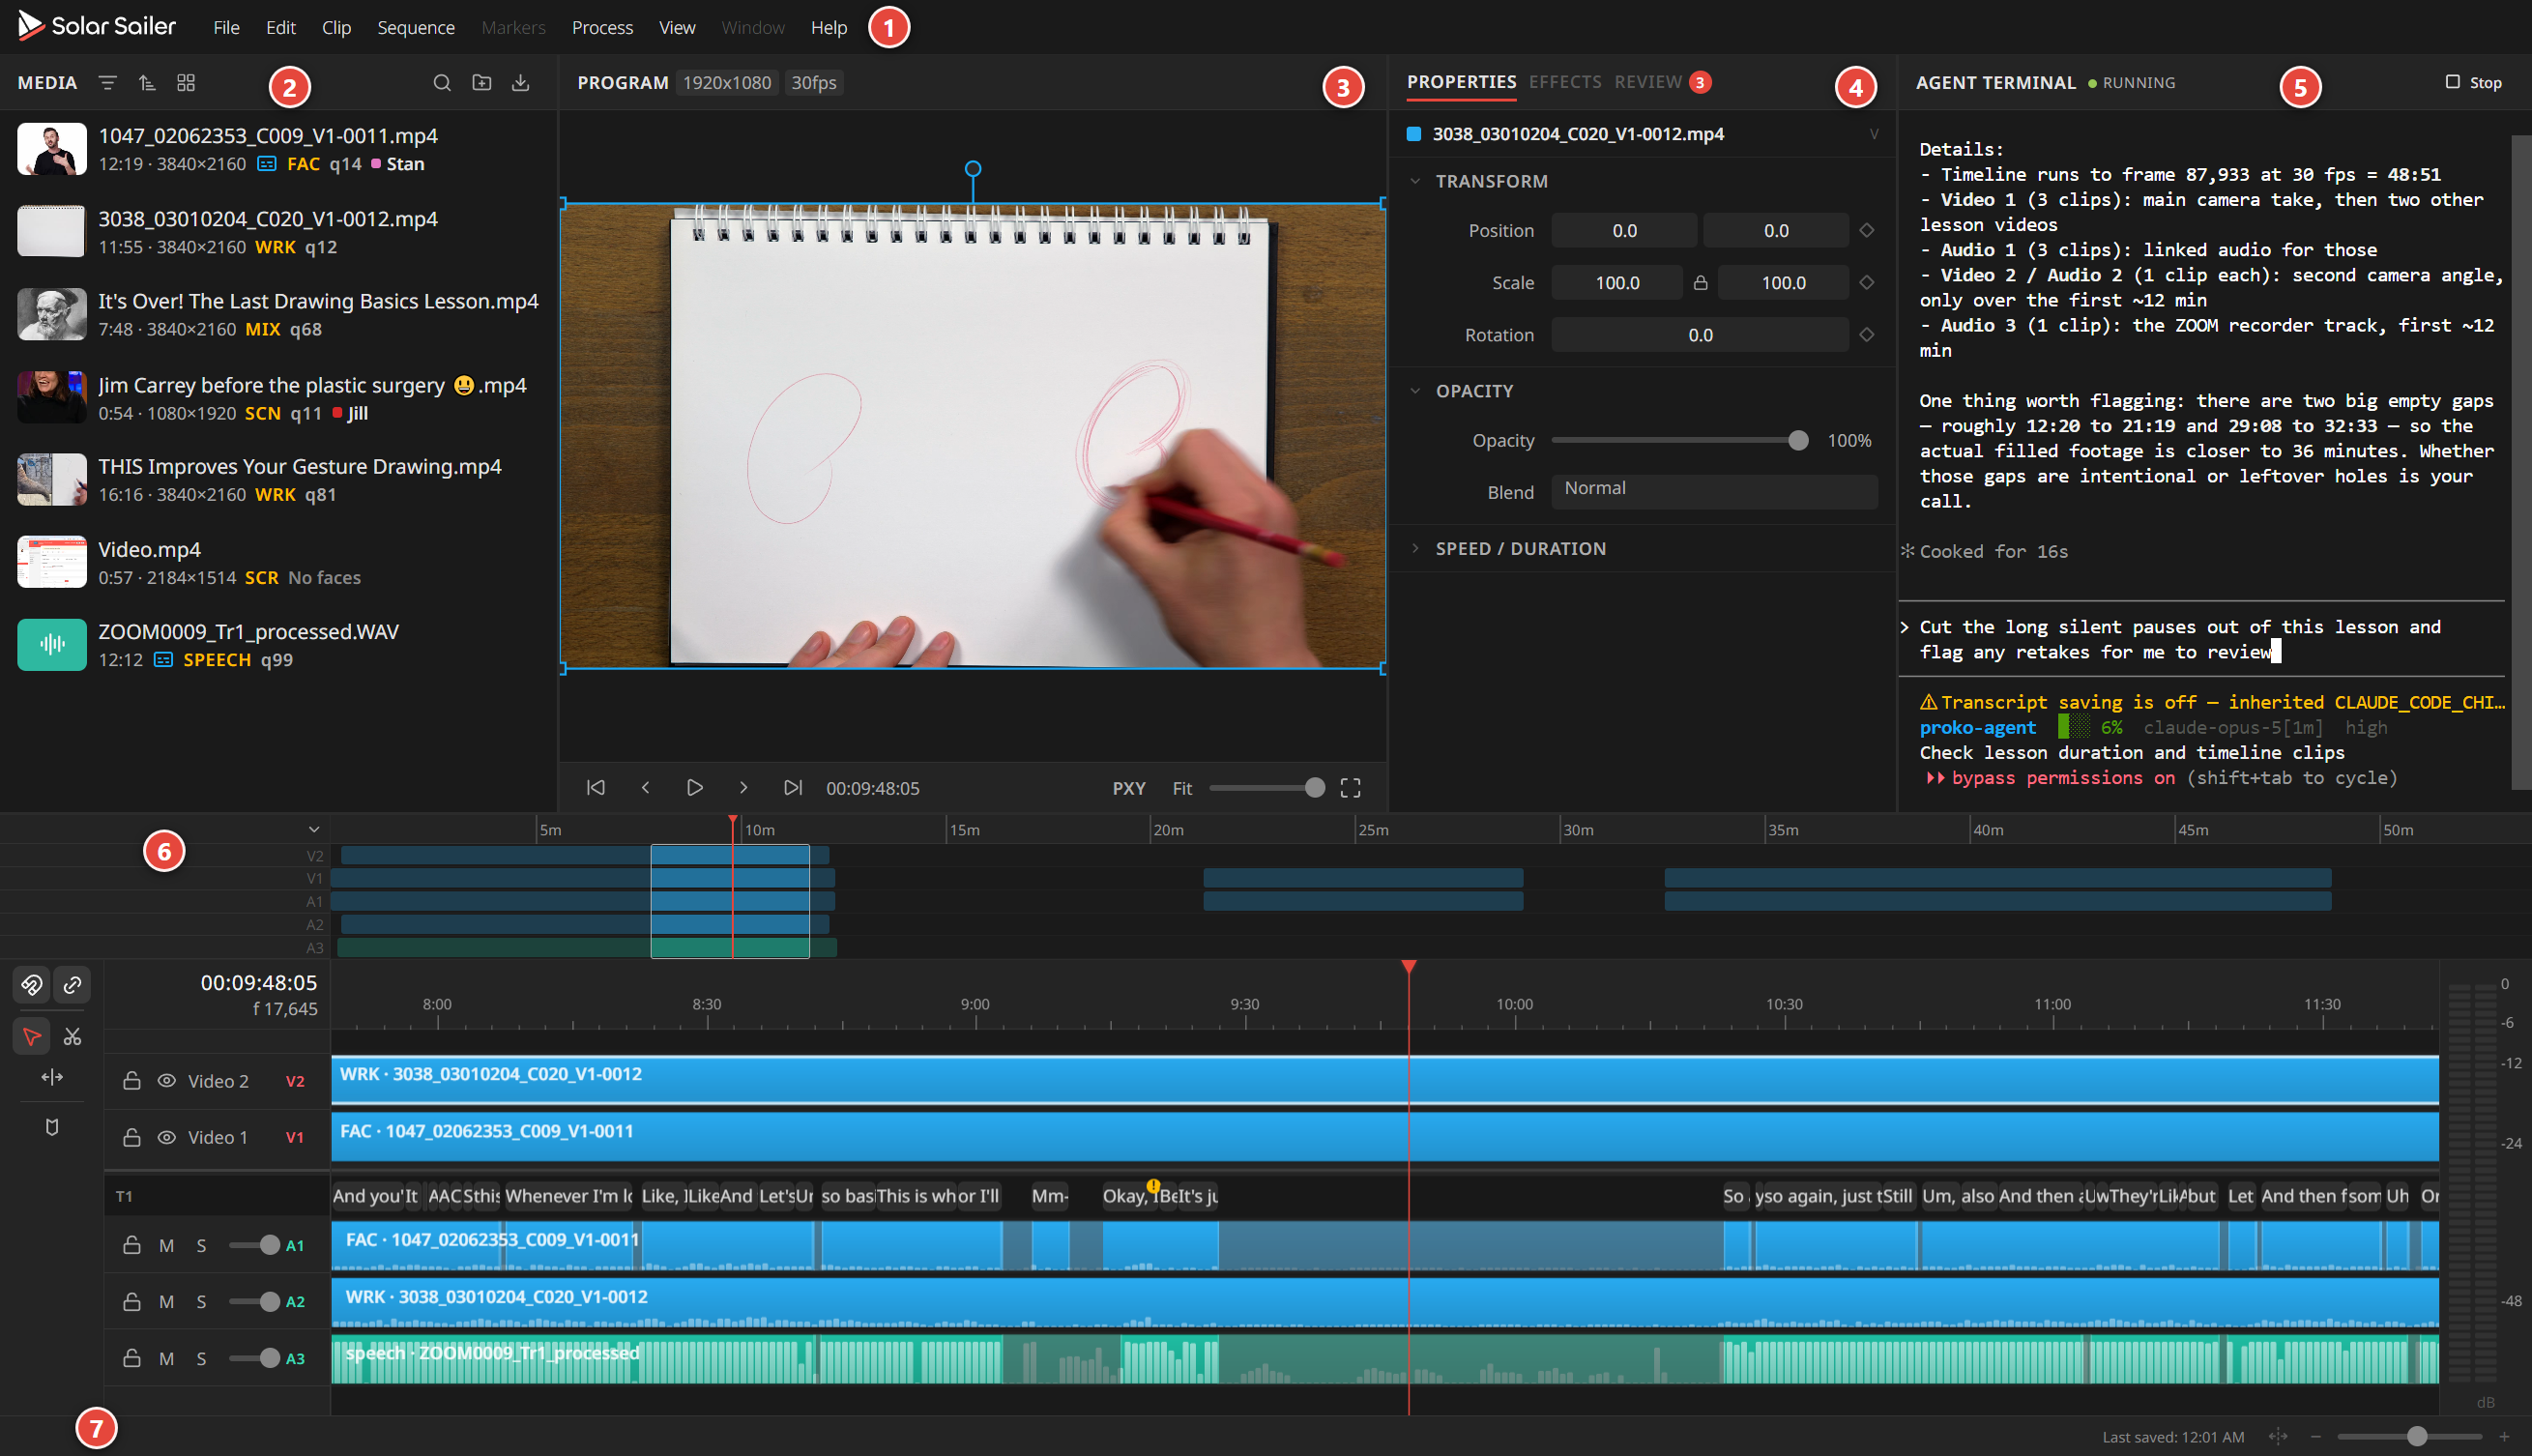
From top to bottom, the window is: the menu strip (1), an upper row of panels (Media (2), Preview (3), Properties (4), and the AI panel (5)), the timeline (6), and a status bar (7). The numbers in the screenshot match the sections below. Drag the dividers between panels to resize them. Panel sizes are remembered the next time you open the app. To give one panel all the room for a moment, point at it and press the backtick key (`). It fills everything between the menu strip and the status bar. Press it again to put the layout back.
Use the menu strip
Solar Sailer's menus live in a strip at the top of the window (1), right of the logo. Click a menu name to open it, hover over another name to switch to it, and press Escape to close. You'll spend most of your time in File, Edit, Process, and View. The Help menu holds Documentation, which opens this documentation site in your browser.
Browse footage in the Media panel
The Media panel (2), on the left, holds everything you've imported. Its toolbar has buttons to sort, switch between Grid view and List view, Search, create a New Folder, and Import Media. You can also drag files straight from Explorer onto the panel. An overlay reading Drop files to import appears while you drag.
Media items carry small badges. For example, PXY means an optimized preview copy exists for that file. See Import Media for the full import workflow.
Watch your edit in the Preview
The Preview (3) shows your video, with the transport bar underneath. The transport bar has buttons for Jump to Start, Step Back, Play/Pause, Step Forward, and Jump to End, plus a timecode readout. When playback runs faster or slower than normal, a speed badge such as 2x appears next to the timecode.
On the right side of the same bar:
- PXY switches between optimized preview media and the original full-resolution files.
- The zoom dropdown offers Fit, 25%, 50%, 75%, 100%, and 200%.
- A master volume slider.
- A fullscreen button (F). Fullscreen always fits the video to the screen.
When playback is paused and a single video clip is selected, handles appear on the video itself so you can move, scale, and rotate the clip directly.
Inspect clips in the Properties panel
The panel to the right of the Preview (4) has four tabs: Properties, Effects, Review, and Markers. The Review tab shows a numbered badge when there are unresolved items to look at.
The Properties tab shows the selected clip's name and track, with sections for Opacity, Speed / Duration, Audio, and Transform. Type a value, or drag across it to scrub. Double-click a property's label to reset it.
Meet the AI panel
The rightmost panel (5) holds the embedded AI assistant. Talk to it in plain English on its Agent tab, a chat that shows each edit the assistant makes as a readable row. A Terminal tab sits next to it for the command-line view. Show or hide the panel from View → AI Assistant Panel, and see The AI Assistant for what it can do.
Work in the timeline
The lower half of the window is the timeline (6). Video tracks sit above a draggable splitter and audio tracks sit below it. V1 and A1 are the tracks closest to the splitter, and the two halves scroll independently.
Around the tracks you'll find:
- Tools strip on the far left: Snap (S), Linked Selection, Selection (V), Razor (C), Slip (Y), and Add Marker (M).
- Mini-timeline above the tracks, a compressed overview of the whole sequence with a draggable viewport box. It can be collapsed.
- A timecode readout in
HH:MM:SS:FFformat, plus a frame count. - Track headers on the left of each track, with Lock, Mute, Solo, and Hide buttons and a volume slider.
- A stereo level meter on the right edge of the timeline.
Right-click a track header to choose Show Transcript Track. This adds a row above that audio track showing the spoken words as pills, lined up with the audio. Transcripts live here on the timeline, not in a separate panel.
Right-click a clip or empty timeline area to find the Display submenu, with toggles for Motion Overlay, Looking Overlay, and Clip Thumbnails (thumbnails are off by default).
Check the status bar
The bar along the bottom (7) shows background work on the left. Click it to open the Background Tasks popover, which lists active jobs or reads No background tasks. Next to it, a warning triangle with an error count, for example 2 errors, appears when clips fail to classify automatically. Click it to read the failures and clear them. It is hidden when there is nothing to report. On the right you'll see Saving… while a save runs, then Last saved: with the time, followed by a button that fits the whole timeline in the window (Shift+Z) and the timeline zoom controls.
Playback shortcuts you'll use on day one
| Key | Action |
|---|---|
| Space | Play / Pause |
| J | When stopped, step back one frame. While playing, halve the speed (down to 0.25×) |
| K | Stop |
| L | Play forward. Press again to double the speed (up to 8×) |
| ← / → | Step back / forward one frame |
| Home / End | Jump to start / end |
| F | Fullscreen toggle |
Ready to bring in footage? Head to Import Media.